Update: Here's a tutorial from Sitepoint that's even better than my post - Creating Custom Options Pages in WordPress .
One of my clients needed a WordPress theme that would be reused by many realtors in different regions. They wanted the realtors to be able to customize the look and feel of their sites without compromising the core functionality that they were hiring me to build. Thesis, because of its extensive Design Options, was the perfect choice. (Here's two examples of the theme in action).
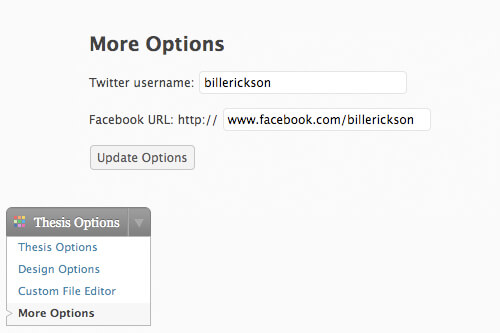
But there were a few parts of the design that they couldn't customize using the Design Options, and I didn't want the client to have to edit the code just for this. So I built an additional page called More Options that appears inside the Thesis Options.
I'll show you how to make that page with two options in it, and how to pull the data from those options into your theme.
Building the More Options page
I'll describe what we're doing verbally then give you the code to use. The code is commented which should help you follow along.
- First we add a new page to the admin menu. we're using the
add_submenu_page()function to add it as a subpage to the Thesis Options page. If you're not using Thesis, you'll want to use theadd_theme_page()function that's commented out. - We create a variable called
$tt_hidden_field_namethat will tell us if the form has been changed. - We create three variables for each option. The first one (
$tt_twitter_option) holds the name of that option in the database (where we're storing the data). The second one ($tt_data_field_name), holds the data that was put into the form on our More Options page. The third one ($tt_twitter_value) pulls the current value of that option out of the database. - If the hidden field is set to "yes," meaning the form has been edited, update the database with the current values on the page, and display the text "Your changes have been saved."
- Now we get to the actual form. For each option, we have the description text and an input field with the default value set to the current value in the database.
- When you click the "Update Options" button, it will set all the data fields to whatever the current value is, and set the hidden field to "yes".
Here's the code to put in your custom_functions.php file:
[php]/* More Options in wp-admin */
add_action('admin_menu', 'thesis_custom_add_page'); // Moves the add page function in the WP dashboard admin menu via WP hook
function thesis_custom_add_page() { // Adds our test page to Thesis menu
add_submenu_page('thesis-options',__('More Options', 'thesis'), __('More Options', 'thesis'), 'edit_themes', 'more-options', 'more_options_admin');
// add_theme_page('More Options', 'More Options', 'edit_themes', 'more-options', 'more_options_admin');
}
function more_options_admin() { // Our function (as seen above) that runs when the page is accessed
$tt_hidden_field_name = 'tt_submit_hidden';
$tt_twitter_option = 'tt_twitter_name'; // Option name (in db)
$tt_data_field_name = 'tt_twitter_field';</code><code>
$fa_facebook_option = 'fa_facebook_name';
$fa_data_field_name = 'fa_facebook_field';
$tt_twitter_value = get_option($tt_twitter_option); // Read in existing option value from database
$fa_facebook_value = get_option($fa_facebook_option);
if( $_POST[ $tt_hidden_field_name ] == 'yes' ) { // If form has been sumbitted
$tt_twitter_value = $_POST[ $tt_data_field_name ]; // Read value from post
$fa_facebook_value = $_POST[ $fa_data_field_name ];
update_option($tt_twitter_option, $tt_twitter_value); // Save value in database
update_option($fa_facebook_option, $fa_facebook_value);
?>
<div><p><strong>Your changes have been saved</strong></p></div>
<?php
}
// Main screen:
echo '<div>';
echo "<h2>More Options</h2>"; // header
?>
<form name="form1" method="post" action="<?php echo str_replace( '%7E', '~', $_SERVER['REQUEST_URI']); ?>">
<input type="hidden" name="<?php echo $tt_hidden_field_name; ?>" value="yes">
<p>Twitter username:
<input type="text" name="<?php echo $tt_data_field_name; ?>" value="<?php echo $tt_twitter_value; ?>" size="25">
</p>
<p>Facebook URL: http://
<input type="text" name="<?php echo $fa_data_field_name; ?>" value="<?php echo $fa_facebook_value;?>" size="25">
</p>
<p>
<input type="submit" name="Submit" value="Update Options" />
</p>
</form>
</div>
<?php
}[/php]
Using the More Options
Now that you have an options page, you're going to want to use the data in your site. Since our fields on the options page asked for a Twitter username and Facebook URL, I'll show you how to make a box on your page that shows a twitter and facebook icon if that value is set.
[php]<div id="social">
<?php
$twitter = get_option('tt_twitter_name');
$facebook = get_option('fa_facebook_name');
?>
<p align="center"><?php if($twitter){?><a href="http://www.twitter.com/<?php echo $twitter;?>"><img src="<?php bloginfo('template_url');?>/custom/images/twitter.jpg" /></a><?php } if($facebook){?> <a href="http://<?php echo $facebook;?>"><img src="<?php bloginfo('template_url');?>/custom/images/facebook.jpg" /></a><?php } ?></p>
</div>[/php]
What it's doing is setting the variables $twitter and $facebook equal to the value in the database, and if those values exist, create a link and show the icon.
While that's a rather simple use of the More Options page, I'm sure you can come up with some really interesting uses. Please post a comment sharing what you're using the extra option page for!

No comments yet